FreeBSD cshrc tips

cshrc tips
作为csh/tcsh的配置文件,常用的包括系统级的/etc/csh.cshrc与用户级的~/.cshrc,后者的优先级高于前者。这里为便于描述,统称cshrc。

1. umask

umask称作用户权限屏蔽位,用于在创建文件或目录时设置默认权限。这里用一些操作来具体说明umask的用法:

> umask                                       # 查看当前umask值
22                                            # 22是csh的默认值
> touch file_umask22 && mkdir dir_umask22/
> ls -lod *_umask22
drwxr-xr-x  2 alphachi  alphachi  – 2 Oct 19 09:51 dir_umask22
-rw-r–r–  1 alphachi  alphachi  – 0 Oct 19 09:51 file_umask22

可以看到,当umask=22时,创建的文件默认权限为rw-r–r–(即644),创建的目录默认权限为rwxr-xr-x(即755)。
在这里,644和755这两个数字是根据“创建默认权限 = 系统默认权限 – umask取值”得出的:
644 = 系统默认权限(文件) – 22
755 = 系统默认权限(目录) – 22
也就是说,文件的系统默认权限为644 + 22 = 666(即rw-rw-rw-),目录的系统默认权限为755 + 22 = 777(即rwxrwxrwx)。这点可以通过将umask设置为0来验证:

> umask 0    # 将umask设置为0
> umask
0
> touch file_umask0 && mkdir dir_umask0/
> ls -lod *_umask0
drwxrwxrwx  2 alphachi  alphachi  – 2 Oct 19 09:52 dir_umask0
-rw-rw-rw-  1 alphachi  alphachi  – 0 Oct 19 09:52 file_umask0

因此可以根据需要在创建文件或目录前临时修改umask取值,例如:

> umask 2
> umask
2
A-desktop > touch file_umask2 && mkdir dir_umask2/
A-desktop > ls -lod *_umask2
drwxrwxr-x  2 alphachi  alphachi  – 2 Oct 19 09:56 dir_umask2     # 775 = 777 – 2
-rw-rw-r–  1 alphachi  alphachi  – 0 Oct 19 09:56 file_umask2    # 664 = 666 – 2

在cshrc中,默认会存在以下配置:

umask 22

需要注意的是,若在cshrc中无此条配置,umask的取值仍然为22,而不是0。

2. PAGER

PAGER是csh/tcsh的常见环境变量,用于设置默认的页面调度程序。以下为cshrc中的默认配置:

setenv PAGER more

将PAGER设置为more的缺点在于:页面输出完毕后若要重新阅读,必须重新调用页面或滚动终端。为了避免这些问题,可以将more更改为功能更为强大的less,即:

setenv PAGER less

与more相比,less的唯一“缺点”在于页面输出完毕后会高亮显示(END)标记,若要退出则需要额外多按一次q键。

3. autorehash

rehash是csh/tcsh的一条内部命令,可以重新计算与环境变量PATH相关的目录的哈希值;在这些目录中添加了新的可执行程序后,往往都需要执行此命令以刷新索引列表,否则系统将无法找到这些程序。
rehash经常在通过Ports安装了新的软件包后使用,例如:
# whereis zsh                          # 这里以通过Ports安装zsh为例
zsh: /usr/ports/shells/zsh
# cd /usr/ports/shells/zsh/
# make BATCH=yes install clean         # BATCH=yes表示使用默认配置编译而跳过编译选项的显示

# zs                                   # 输入zs后按Ctrl+d尝试补全
zstreamdump                            # 没有执行rehash前找不到zsh的相关命令
# rehash
# zs                                   # 再次输入zs后按Ctrl+d尝试补全
zsh         zsh-5.0.0   zstreamdump    # 执行rehash后即可找到相关命令

从版本6.18开始,csh/tcsh引入了新的特殊Shell变量autorehash,用于自动执行rehash操作。若要开启此功能,只需要在cshrc中添加:

set autorehash = always

取值always是指在命令补全和拼写校正时均自动执行rehash操作。若仅需在命令补全时自动执行,可将always更换为complete;若仅需在拼写校正时自动执行,可将always更换为correct。
需要注意的是,默认情况下此功能至少需要在FreeBSD 9.0-STABLE中才能开启,因为之前版本(如9.0-RELEASE)中tcsh的版本均低于6.18。

4. listjobs

listjobs是另一个有用的特殊Shell变量,用于控制任务挂起时的显示方式,以下举例说明:

> set | grep listjobs    # 命令无输出结果表示当前未设置listjobs
> ping www.freebsd.org
PING red.freebsd.org (69.147.83.34): 56 data bytes
64 bytes from 69.147.83.34: icmp_seq=0 ttl=49 time=332.853 ms
^Z                       # 按Ctrl+z挂起
Suspended
> set listjobs           # 仅开启变量listjobs(等于在cshrc中添加配置set listjobs)
> ping www.freebsdchina.org
PING www.freebsdchina.org (222.73.165.29): 56 data bytes
64 bytes from 222.73.165.29: icmp_seq=0 ttl=50 time=73.343 ms
^Z
[1]  – Suspended                     ping www.freebsd.org
[2]  + Suspended                     ping www.freebsdchina.org
> set listjobs = long    # 设置变量listjobs(等于在cshrc中添加配置set listjobs = long)
> ping www.google.com
PING www.google.com (74.125.128.106): 56 data bytes
64 bytes from 74.125.128.106: icmp_seq=1 ttl=45 time=35.502 ms
^Z
[1]    57930 Suspended                     ping www.freebsd.org
[2]  – 57946 Suspended                     ping www.freebsdchina.org
[3]  + 57951 Suspended                     ping www.google.com

可以看到,对于未设置、仅开启、设置变量listjobs这三种情况,任务挂起时的显示信息依次会更加详细。

5. 关于alias

alias为csh/tcsh引入的别名功能非常强大,详见一切皆alias。
虽然alias一般仅出现在cshrc中,但实际上它是csh/tcsh自带的内部命令,因此可以单独使用,例如:
> alias                             # 不使用任何参数则列出所有的别名条目
h       (history 25)
j       (jobs -l)
la      (ls -a)
lf      (ls -FA)
ll      (ls -lA)
> unalias h                         # 删除指定的别名条目
> alias reboot ‘shutdown -r now’    # 添加新的别名条目:
                                    # 在这里系统自带的reboot命令将不再生效,因为alias的优先级更高
j       (jobs -l)
l       (ls -alo)
la      (ls -a)
lf      (ls -FA)
ll      (ls -lA)
reboot  (shutdown -r now)
> \reboot                           # 在命令前添加转义字符\可以忽略alias设置而直接运行原始命令

注意手动输入的alias/unalias仅对当前Shell进程有效,若要始终生效应将其写入cshrc。
无论是采用何种方式配置alias,为防止其可能被Shell曲解,应该为真实命令部分(如上例中的shutdown -r now)的两端添加单引号,若在真实命令部分中存在变量替换,则应将单引号改为双引号。

6. 关于complete

与alias类似,complete也是csh/tcsh自带的内部命令;因此既可以单独使用,也可以写入cshrc。
顾名思义,complete是用于命令补全的,但与普通补全相比其功能更加强大,可以称之为高级补全。
在cshrc中,可以配置以下的普通补全:

if ($?prompt) then            # 仅对交互式Shell生效
    set autolist              # 按下Tab键直接补全
    set complete = enhance    # 补全时忽略大小写,认为-与_相同,将.、-、_作为单词分隔符;
                              # 若将enhance更换为igncase则仅忽略大小写
    set autoexpand            # 补全时参考history命令的输出
endif

配置生效后,将其与complete设置的高级补全进行比较:

> su                                   # 输入su后按Tab键的结果如下
su      sum     suspend                # 注意机器不同可能会出现更多输出
> complete -su* ‘p/0/(su suspend)/’    # 对关键字su设置高级补全:
                                       # -su*表示仅作用于关键字su,例如输入su空格后按Tab键是没有效果的
                                       # p表示作用位置,例如p/0在这里表示作用于su本身
                                       # ()用于限定补全条目,例如这里将补全条目限定于su与suspend
> complete                             # 查看高级补全条目
-su*    ‘p/0/(su suspend)/’
> su                                   # 高级补全下,输入su后按Tab键的结果如下
su      suspend
> uncomplete -su*                      # 删除高级补全条目

可以看到,两者的最大区别在于:在普通补全的基础上,高级补全能够实现更多的条件输出。除此之外,高级补全还能够实现很多普通补全难以实现的补全操作,例如:

> complete man ‘p/*/c/’    # 针对man命令的高级补全:
                           # p表示作用位置,p/*表示对输入的man空格后的任意位置的参数执行补全
                           # c表示补全候选项为当前系统内存在的所有命令
> man a                    # 输入man a后按Tab键的结果如下(此时p/*/c中*为1)
ac          addr2line   amd         ar          at          audit
accton      adduser     amq         arp         atacontrol  auditd
acpiconf    adjkerntz   ancontrol   arpaname    ath3kfw     auditreduce
acpidb      afmtodit    apm         as          atmconfig   authpf
acpidump    alias       apply       asa         atq         awk
addftinfo   alloc       apropos     asf         atrm
> man -w p                 # 输入man -w p后按Tab键的结果如下(此时p/*/c中*为2)
pac           pfbtops       pkg_info      powerd        ps
pagesize      pfctl         pkg_updating  poweroff      psroff
passwd        pflogd        pkg_version   ppp           pstat
paste         pftp          pkill         pppctl        purgestat
patch         pgrep         pmcannotate   pr            pushd
pathchk       pic           pmccontrol    praliases     pw
pawd          ping          pmcstat       praudit       pwait
pax           ping6         popd          pre-grohtml   pwd
pc-sysinstall pkg_add       portaudit     printenv      pwd_mkdb
pciconf       pkg_cleanup   portmaster    printf
periodic      pkg_create    portsnap      procctl
perror        pkg_delete    post-grohtml  procstat

再看一个非常实用的高级补全范例:在csh/tcsh中快速ssh到已保存主机。
1)创建或编辑~/.ssh/config,此文件可以为多个SSH主机保存不同的配置参数(详见man ssh_config):

Host firewall
    HostName     192.168.0.1     # 主机地址
    User         froot           # 登录用户名
    Port         50000           # 连接端口
    IdentityFile ~/.ssh/id/fw    # 调用的私钥文件
    Compression  yes             # 开启压缩
Host router
    HostName            192.168.10.1
    User                root
    Port                51000
    IdentityFile        ~/.ssh/id/router
    ServerAliveInterval 60       # 每60秒发送一次alive包以防止空闲掉线
Host switch
    HostName 192.168.100.1
    User     admin
    Port     54321

2)在cshrc中添加以下内容:

if (-e ~/.ssh/config) then     # 若~/.ssh/config存在则执行以下命令:
                               # 变量sshlist为由~/.ssh/config获取并格式化的主机列表
                               # p/1/($sshlist)将ssh空格后的第一个参数的补全内容限制在($sshlist)中
    set sshlist = `grep Host\  ~/.ssh/config | cut -d \  -f 2`
    complete ssh "p/1/($sshlist)/"
endif

3)通过source cshrc命令使编辑后的cshrc即时生效,然后查看补全效果:

> ssh                       # 输入ssh空格后按Tab键的结果如下
firewall router   switch    # 选择所需补全即可开始连接至对应主机
                            # 若在~/.ssh/config中添加了新的主机,也需要通过source cshrc命令即时生效

当然,complete命令的功能远不止于此,详见man tcsh中REFERENCE > Builtin command > complete一节。
注意与alias相同,手动输入的complete/uncomplete仅对当前Shell进程有效,若要始终生效应将其写入cshrc,此外引号的使用规则也是一样的。

7. 快捷键绑定

csh/tcsh中的快捷键设置实际上也是通过内部命令实现的,例如:

> bindkey -a    # 列出已绑定的快捷键("^"表示Ctrl,"^["表示Alt)
> bindkey -v    # 按照vi方式绑定快捷键
> bindkey -e    # 按照emacs方式绑定快捷键
> bindkey -h    # 显示所有帮助信息

与所有内部命令相同,bindkey既可以手动配置也可以写入cshrc中。
在控制台下,若需使用左Alt作为快捷键前缀,除了根据bindkey命令配置外,还应执行以下操作:
1)编辑/usr/share/syscons/keymaps/us.iso.kbd,将056行的首个lalt修改为meta;
2)执行kbdcontrol -l us.iso.kbd,也可在/etc/rc.conf中添加keymap=“us.iso.kbd”以使其永久生效。
注意此设置会带来一些“副作用”,例如无法再通过左Alt配合F功能键切换控制台,不过可以使用Ctrl+左Alt或右Alt替代。
8. 个性化提示符

提示符一节中已经对此做了详细的描述,这里仅说明如何针对X与控制台设置不同的提示符。
在cshrc中添加以下内容:

if ($?prompt) then
    if ($?DISPLAY) then    # 针对X:
                           # 特殊字符串%{\e]0;加\a%}的组合可以将两者中间的字符发送至终端模拟器
                           # 其他的%相关含义详见man tcsh中REFERENCE > Special shell variables > prompt一节
        set prompt = "%{\e]0;%l = %~\a%}%B%m %# %b"
    else                   # 针对控制台
        set prompt = "%B%m:%l%b %~ %B%# %b"
    endif
endif

以上设置生效后,在X下类似于XTerm的终端模拟器里,csh/tcsh的提示符中被发送的字符会显示于窗口标题栏,而在控制台下则会全部显示。

附:更多的cshrc范例

在Ports中提供了一个关于cshrc的包,位于/usr/ports/shells/tcshrc;安装之后,可以学到一些更高级的配置写法。

原文链接:https://wiki.freebsdchina.org/doc/c/cshrc_tips

安装与配置nginx下的php (PHP-FPM模式)

如何:安装与配置nginx下的php (PHP-FPM模式)

准备工作

使用FreeBSD的Ports安装软件时,请一定先把Ports更新到最新版本

#portsnap fetch update

如果你是第一次使用portsnap,可能需要先执行

#portsnap extract

安装并启用nginx服务

首先,安装nginx:

#cd /usr/ports/www/nginx
#make install clean

在出现的选项中,可能有一些你不熟悉的选项存在,如果你不明白各个选项的含义,可以用下面的默认值:

[X] HTTP_MODULE               Enable HTTP module
[X] HTTP_ADDITION_MODULE      Enable http_addition module
[X] HTTP_CACHE_MODULE         Enable http_cache module
[X] HTTP_DAV_MODULE           Enable http_webdav module
[X] HTTP_FLV_MODULE           Enable http_flv module
[X] HTTP_GEOIP_MODULE         Enable http_geoip module
[X] HTTP_GZIP_STATIC_MODULE   Enable http_gzip_static module
[X] HTTP_IMAGE_FILTER_MODULE  Enable http_image_filter module
[X] HTTP_PERL_MODULE          Enable http_perl module
[X] HTTP_RANDOM_INDEX_MODULE  Enable http_random_index module
[X] HTTP_REALIP_MODULE        Enable http_realip module
[X] HTTP_REWRITE_MODULE       Enable http_rewrite module
[X] HTTP_SECURE_LINK_MODULE   Enable http_secure_link module
[X] HTTP_SSL_MODULE           Enable http_ssl module
[X] HTTP_STATUS_MODULE        Enable http_stub_status module
[X] HTTP_SUB_MODULE           Enable http_sub module
[X] HTTP_XSLT_MODULE          Enable http_xslt module

在命令执行完成后,使用编辑器把下面的内容添加到/etc/rc.conf中

nginx_enable="YES"

安装PHP-FPM及相关连的包

以root身份继续执行下面的操作

#cd /usr/ports/devel/pcre
#make install clean
#cd /usr/ports/devel/libtool
#make install clean
#cd /usr/ports/lang/php5
#make install clean
#cd /usr/ports/lang/php5-extensions
#make install clean

在php5-extensions的config页面中,需要勾选PHP-FPM项。

执行完成后,把下面的代码加入/etc/rc.conf以启用PHP-FPM

php_fpm_enable="YES"

同时还要创建一个php.ini文件:

#cp /usr/local/etc/php.ini-production /usr/local/etc/php.ini

同时可以编辑php.ini,把里面的timezone设置为Asia/Shanghai或者需要使用的时区。

启动服务

#/usr/local/etc/rc.d/php-fpm start
#/usr/local/etc/rc.d/nginx start

这样就成功启动了服务

配置虚拟主机运行PHP程序

准备网站目录

首先建立网站的目录和日志存放目录,日志即可以配置到/var/logs/nginx下面,也可以配置到任何你希望存放的位置。

mkdir /home/saharabear.com/public_html
mkdir /home/saharabear.com/logs

配置nginx.conf

可以直接参考下面的配置文件来修改/usr/local/etc/nginx/nginx.conf

user  nobody;
worker_processes  1;

error_log  logs/error.log;

pid        logs/nginx.pid;

events {
    worker_connections  1024;
}

http {
    include       mime.types;
    default_type  application/octet-stream;

    log_format  main  ‘$remote_addr – $remote_user [$time_local] "$request" ‘
                      ‘$status $body_bytes_sent "$http_referer" ‘
                      ‘"$http_user_agent" "$http_x_forwarded_for"’;

    sendfile        on;

    keepalive_timeout  65;

    gzip  on;

    # We define the virtual host here
    server {
        listen       208.62.123.122:80;
        server_name  saharabear.com www.saharabear.com;

        access_log  /home/saharabear.com/logs/access.log  main;

        location / {
            root   /home/saharabear.com/public_html;
            index  index.html index.htm index.php;
        }
    # Let nginx know how to handle PHP using fastcgi
        location ~ \.php$ {
            root           html;
            fastcgi_pass   127.0.0.1:9000;
            fastcgi_index  index.php;
            fastcgi_param  SCRIPT_FILENAME  /home/saharabear.com/public_html$fastcgi_script_name;
            # 上面这一行很重要,别忘了修改这里
            include        fastcgi_params;
        }

        location ~ /\.ht {
            deny  all;
        }
    }
}

重新启动nginx服务器就可以了

#/usr/local/etc/rc.d/nginx restart

配置虚拟主机运行使用Symfony2框架的PHP程序

对于PHP的Symfony2框架,配置nginx可能会有一些不同,比如Symfony2使用app.php和app_dev.php作为前端入口等等,可以参考下面的代码配置Symfony2的PHP程序

    server {
        listen       80;
        server_name  test.saharabear.com ;
        root /home/test.saharabear.com/symfony/web;
        charset utf-8;

        access_log  /home/test.saharabear.com/logs/access.log  main;
        error_log /home/test.saharabear.com/logs/errors.log;
        # strip app.php/ prefix if it is present
        rewrite ^/app\.php/?(.*)$ /$1 permanent;

        location / {
          index app.php;
          try_files $uri @rewriteapp;
        }

        location @rewriteapp {
          rewrite ^(.*)$ /app.php/$1 last;
        }

        # pass the PHP scripts to FastCGI server listening on 127.0.0.1:9000
        location ~ ^/(app|app_dev)\.php(/|$) {
          fastcgi_pass   127.0.0.1:9000;
          fastcgi_split_path_info ^(.+\.php)(/.*)$;
          include fastcgi_params;
          fastcgi_param  SCRIPT_FILENAME    $document_root$fastcgi_script_name;
          fastcgi_param  HTTPS              off;
        }

        # deny access to .htaccess files, if Apache’s document root
        # concurs with nginx’s one
        #
        location ~ /\.ht {
            deny  all;
        }
    }

原文链接:https://wiki.freebsdchina.org/howto/n/php_php-fpm_nginx

FreeBSD下安装lighttpd

安装 lighttpd 於 FreeBSD

作者:zeissoctopus

以下是我安装和配置 lighttpd 1.4.29 万维网服务器於 FreeBSD 8-Stable 的笔记。我会启动以下几项功能:

SSL
lighttpd 的 simple namebase virtualhost
FastCGI 支援 PHP

1: 安装软件

从 ports 编译安装 lighttpd 入 FreeBSD

% cd /usr/ports/www/lighttpd
% su root
# make install
# make clean
# exit

以下是我用 ports 编译 lighttpd 时所选择的选项

WITHOUT_BZIP2    true
WITHOUT_CML    true
WITHOUT_FAM    true
WITHOUT_GDBM    true
WITH_IPV6    true
WITHOUT_LIBEV    true
WITHOUT_MAGNET    true
WITHOUT_MEMCACHE    true
WITHOUT_MYSQL    true
WITHOUT_MYSQLAUTH    true
WITHOUT_NODELAY    true
WITHOUT_OPENLDAP    true
WITH_OPENSSL    true
WITHOUT_SPAWNFCGI    true
WITHOUT_VALGRIND    true
WITHOUT_WEBDAV    true
FreeBSD 默认 Httpd 使用者身份是 www:www

2: 安排网站的文件目录

lighttpd 执行时,会产生一些文件。lighttpd 也会找寻网站实际放置的位置。因此需要事先安排妥当。因为我只需要 lighttpd 为一个 domain 服务,所以我只需要依 从 simple virtualhost 规则建立网站的目录结构。然而所有文件位置皆可以自由安排,本例子是依从我个人喜好来决定而已。

lighttpd 执行时产生的文件

image

lighttpd 的 simple namebase virtualhost 目录安排

除了根目录外,其余皆以 virtual host 网站名称来命名目录

image

3: 配置 FreeBSD ports 里的 lighttpd

在 FreeBSD 里默认配置文件的位置

image

有关本例子载入配置文件的次序

本例子会启动 Lighttpd 的 ssl、fastcgi 和 simple_vhost 模块,因此有关配置文件会按以 下次序读入:

/usr/local/etc/lighttpd/lighttpd.conf
/usr/local/etc/lighttpd/modules.conf
/usr/local/etc/lighttpd/conf.d/fastcgi.conf
/usr/local/etc/lighttpd/conf.d/simple_vhost.conf
换言之,本例子只需要适当修改以上4个配置文件。

lighttpd.conf 内容

#######################################################################
##
## /usr/local/etc/lighttpd/lighttpd.conf
##
#######################################################################
 
#######################################################################
##
## 定义有些有关目录的变量
##
var.log_root    = "/var/log/lighttpd"
var.state_dir   = "/var/run"
var.home_dir    = "/var/spool/lighttpd"
var.conf_dir    = "/usr/local/etc/lighttpd"
 
##
## Virutal Hosts 的根目录
##
## 用于以下模块:
## conf.d/evhost.conf
## conf.d/simple_vhost.conf
## vhosts.d/vhosts.template
##
var.vhosts_dir  = "/home/www"
 
##
## CGI/FastCGI socket 目录
##
## 用于以下模块:
## conf.d/fastcgi.conf
## conf.d/scgi.conf
##
var.socket_dir  = "/var/lib/lighttpd/sockets"
 
##
#######################################################################
 
#######################################################################
##
## 载入模块定义文件
include "modules.conf"
 
##
#######################################################################
 
#######################################################################
##
##  Lighttpd 基本设定
## ———————
##
server.port = 80
 
## 用否 IPv6?
server.use-ipv6 = "disable"
 
## 缚紧 IP
server.bind = "127.0.0.1"
 
## Lighttpd 以什么身份执行.
server.username  = "www"
server.groupname = "www"
 
## Server: 回应字串
server.tag = "lighttpd"
 
## Lighttpd 的 pid 文件
server.pid-file = state_dir + "/lighttpd.pid"
 
## 默认文件目录
server.document-root = "/home/www/example.org/htdocs/"
 
##
#######################################################################
 
#######################################################################
##
##  Logging 选项
## ——————
##
server.errorlog             = log_root + "/lighttpd-error.log"
 
##
## Access log config
##
include "conf.d/access_log.conf"
 
##
## The debug options are moved into their own file.
## see conf.d/debug.conf for various options for request debugging.
##
include "conf.d/debug.conf"
 
##
#######################################################################
 
#######################################################################
##
##  Tuning/Performance
## ——————–
##
server.event-handler = "freebsd-kqueue"
 
##
## The basic network interface for all platforms at the syscalls read()
## and write(). Every modern OS provides its own syscall to help network
## servers transfer files as fast as possible
##
## linux-sendfile – is recommended for small files.
## writev         – is recommended for sending many large files
##
server.network-backend = "writev"
 
##
## As lighttpd is a single-threaded server, its main resource limit is
## the number of file descriptors, which is set to 1024 by default (on
## most systems).
##
## If you are running a high-traffic site you might want to increase this
## limit by setting server.max-fds.
##
## Changing this setting requires root permissions on startup. see
## server.username/server.groupname.
##
## By default lighttpd would not change the operation system default.
## But setting it to 2048 is a better default for busy servers.
##
server.max-fds = 2048
 
##
## Stat() call caching.
##
## lighttpd can utilize FAM/Gamin to cache stat call.
##
## possible values are:
## disable, simple or fam.
##
server.stat-cache-engine = "simple"
 
##
## Fine tuning for the request handling
##
## max-connections == max-fds/2 (maybe /3)
## means the other file handles are used for fastcgi/files
##
server.max-connections = 1024
 
##
## How many seconds to keep a keep-alive connection open,
## until we consider it idle.
##
## Default: 5
##
server.max-keep-alive-idle = 5
 
##
## How many keep-alive requests until closing the connection.
##
## Default: 16
##
server.max-keep-alive-requests = 16
 
##
## Maximum size of a request in kilobytes.
## By default it is unlimited (0).
##
## Uploads to your server cant be larger than this value.
##
server.max-request-size = 0
 
##
## Time to read from a socket before we consider it idle.
##
## Default: 60
##
server.max-read-idle = 60
 
##
## Time to write to a socket before we consider it idle.
##
## Default: 360
##
server.max-write-idle = 360
 
##
##  Traffic Shaping
## —————–
##
## see /usr/share/doc/lighttpd/traffic-shaping.txt
##
## Values are in kilobyte per second.
##
## Keep in mind that a limit below 32kB/s might actually limit the
## traffic to 32kB/s. This is caused by the size of the TCP send
## buffer.
##
## per server:
##
server.kbytes-per-second = 128
 
##
## per connection:
##
connection.kbytes-per-second = 32
 
##
#######################################################################
 
#######################################################################
##
##  Filename/File handling
## ————————
 
##
## files to check for if …/ is requested
## index-file.names            = ( "index.php", "index.rb", "index.html",
##                                 "index.htm", "default.htm" )
##
index-file.names += (
  "index.xhtml", "index.html", "index.htm", "index.php"
)
 
##
## deny access the file-extensions
##
## ~    is for backupfiles from vi, emacs, joe, …
## .inc is often used for code includes which should in general not be part
##      of the document-root
url.access-deny             = ( "~", ".inc" )
 
##
## disable range requests for pdf files
## workaround for a bug in the Acrobat Reader plugin.
##
$HTTP["url"] =~ "\.pdf$" {
  server.range-requests = "disable"
}
 
##
## which extensions should not be handle via static-file transfer
##
## .php, .pl, .fcgi are most often handled by mod_fastcgi or mod_cgi
##
static-file.exclude-extensions = ( ".php", ".php5", ".pl", ".fcgi", ".scgi" )
 
##
## mimetype mapping
##
include "conf.d/mime.conf"
 
##
## directory listing configuration
##
include "conf.d/dirlisting.conf"
 
##
## Should lighttpd follow symlinks?
##
server.follow-symlink = "disable"
 
##
## force all filenames to be lowercase?
##
server.force-lowercase-filenames = "disable"
 
##
## defaults to /var/tmp as we assume it is a local harddisk
##
server.upload-dirs = ( "/var/tmp" )
 
##
#######################################################################
 
#######################################################################
##
## SSL Settings
##
$SERVER["socket"] == ":443" {
ssl.engine = "enable"
ssl.pemfile = "/usr/local/etc/ssl/crt/YourHost.pem"
ssl.use-sslv3 = "enable"
ssl.cipher-list = "TLSv1+HIGH:SSLv3+HIGH:!aNULL:!eNULL:!3DES:@STRENGTH"
}
 
##
#######################################################################
 
#######################################################################
##
## Simple virtual host
##
 
$HTTP["host"] != "wiki.example.org" {
accesslog.filename = log_root + "/example.org-access.log"
}
 
 
$HTTP["host"] == "wiki.example.org" {
accesslog.filename = log_root + "/wiki.example.org-access.log"
}

modules.conf 内容

#######################################################################
##
##  Modules to load
## —————–
##
## at least mod_access and mod_accesslog should be loaded
## all other module should only be loaded if really neccesary
##
## – saves some time
## – saves memory
##
## the default module set contains:
##
## "mod_indexfile", "mod_dirlisting", "mod_staticfile"
##
## you dont have to include those modules in your list
##
## Modules, which are pulled in via conf.d/*.conf
##
## NOTE: the order of modules is important.
##
## – mod_accesslog     -> conf.d/access_log.conf
## – mod_compress      -> conf.d/compress.conf
## – mod_status        -> conf.d/status.conf
## – mod_webdav        -> conf.d/webdav.conf
## – mod_cml           -> conf.d/cml.conf
## – mod_evhost        -> conf.d/evhost.conf
## – mod_simple_vhost  -> conf.d/simple_vhost.conf
## – mod_mysql_vhost   -> conf.d/mysql_vhost.conf
## – mod_trigger_b4_dl -> conf.d/trigger_b4_dl.conf
## – mod_userdir       -> conf.d/userdir.conf
## – mod_rrdtool       -> conf.d/rrdtool.conf
## – mod_ssi           -> conf.d/ssi.conf
## – mod_cgi           -> conf.d/cgi.conf
## – mod_scgi          -> conf.d/scgi.conf
## – mod_fastcgi       -> conf.d/fastcgi.conf
## – mod_proxy         -> conf.d/proxy.conf
## – mod_secdownload   -> conf.d/secdownload.conf
## – mod_expire        -> conf.d/expire.conf
##
 
server.modules = (
  "mod_access",
  "mod_alias",
  "mod_auth",
#  "mod_evasive",
  "mod_redirect",
  "mod_rewrite",
  "mod_setenv",
#  "mod_usertrack",
)
 
##
#######################################################################
 
#######################################################################
##
##  Config for various Modules
##
 
##
## mod_ssi
##
#include "conf.d/ssi.conf"
 
##
## mod_status
##
#include "conf.d/status.conf"
 
##
## mod_webdav
##
#include "conf.d/webdav.conf"
 
##
## mod_compress
##
#include "conf.d/compress.conf"
 
##
## mod_userdir
##
#include "conf.d/userdir.conf"
 
##
## mod_magnet
##
#include "conf.d/magnet.conf"
 
##
## mod_cml
##
#include "conf.d/cml.conf"
 
##
## mod_rrdtool
##
#include "conf.d/rrdtool.conf"
 
##
## mod_proxy
##
#include "conf.d/proxy.conf"
 
##
## mod_expire
##
#include "conf.d/expire.conf"
 
##
## mod_secdownload
##
#include "conf.d/secdownload.conf"
 
##
#######################################################################
 
#######################################################################
##
## CGI modules
##
 
##
## SCGI (mod_scgi)
##
#include "conf.d/scgi.conf"
 
##
## FastCGI (mod_fastcgi)
##
include "conf.d/fastcgi.conf"
 
##
## plain old CGI (mod_cgi)
##
#include "conf.d/cgi.conf"
 
##
#######################################################################
 
#######################################################################
##
## VHost Modules
##
##  Only load ONE of them!
## ========================
##
 
##
## You can use conditionals for vhosts aswell.
##
## see http://www.lighttpd.net/documentation/configuration.html
##
 
##
## mod_evhost
##
#include "conf.d/evhost.conf"
 
##
## mod_simple_vhost
##
include "conf.d/simple_vhost.conf"
 
##
## mod_mysql_vhost
##
#include "conf.d/mysql_vhost.conf"
 
##
#######################################################################

fastcgi.conf 内容

以下 fastcgi.conf 仅支援 PHP5,并以 socket 方式来连接 Lighttpd 和 FastCGI Daemon,在 FreeBSD 里,php-cgi 是放在 /usr/local/bin 目录。

#######################################################################
##
##  FastCGI Module
## —————
##
## http://www.lighttpd.net/documentation/fastcgi.html
##
server.modules += ( "mod_fastcgi" )
 
##
## PHP Example
## For PHP don’t forget to set cgi.fix_pathinfo = 1 in the php.ini.
##
## The number of php processes you will get can be easily calculated:
##
## num-procs = max-procs * ( 1 + PHP_FCGI_CHILDREN )
##
## for the php-num-procs example it means you will get 17*5 = 85 php
## processes. you always should need this high number for your very
## busy sites. And if you have a lot of RAM. 🙂
##
fastcgi.server = ( ".php" =>
                   ( "php-local" =>
                     (
                       "socket" => socket_dir + "/php-fcgi.socket",
                       "bin-path" => "/usr/local/bin/php-cgi",
                       "bin-environment" => (
                         "PHP_FCGI_CHILDREN" => "8",
                         "PHP_FCGI_MAX_REQUESTS" => "10000",
                       ),
                       "max-procs" => 1,
                       "broken-scriptfilename" => "enable",
                     )
                   ),
                )
simple_vhost.conf 内容

simple_vhost.conf
#######################################################################
##
##  Simple Virtual hosting
## ————————
##
## http://www.lighttpd.net/documentation/simple-vhost.html
##
server.modules += ( "mod_simple_vhost" )
 
##  If you want name-based virtual hosting add the next three settings and load
##  mod_simple_vhost
##
## document-root =
##   virtual-server-root + virtual-server-default-host + virtual-server-docroot
## or
##   virtual-server-root + http-host + virtual-server-docroot
##
simple-vhost.server-root   = vhosts_dir + "/"
simple-vhost.default-host  = "example.org"
simple-vhost.document-root = "htdocs"
 
##
## Print some errors for finding the document-root
##
#simple-vhost.debug = "enable"
 
##
#######################################################################

4: 启动 Lighttpd 服务

请在 /etc/rc.conf 加入以下一行。那么每次重启 FreeBSD 皆会自动启动 Lighttpd

lighttpd_enable="YES"

不想重启 FreeBSB,立即启动 Lighttpd 的话,按上面修改 /etc/rc.conf 后输入以下命令便可。

% su –
# service lighttpd start
# exit

原文链接:http://wiki.freebsdchina.org/doc/l/lighttpd_1_14_29

在GPT盘的ZFS上安装FreeBSD8

在GPT盘的ZFS上安装FreeBSD8

本文参考了Installing FreeBSD Root on ZFS using GPT

通过DVD或者Memstick启动,选择Fixit。

硬盘gpt分区

创建gpt盘

gpart create -s gpt ad0

创建引导区

gpart add -s 64K -t freebsd-boot ad0

创建swap分区(标记label,避免将来硬盘接口改变导致无法识别)

gpart add -s 8G -t freebsd-swap -l swap0 ad0

创建用于zfs的分区

gpart add -t freebsd-zfs ad0

写入freebsd的zfs引导

gpart bootcode -b /mnt2/boot/pmbr -p /mnt2/boot/gptzfsboot -i 1 ad0

创建zpool

加载zfs模块

kldload /mnt2/boot/kernel/opensolaris.ko
kldload /mnt2/boot/kernel/zfs.ko

创建zpool

mkdir /boot/zfs
zpool create zroot ad0p3
zpool set bootfs=zroot zroot

创建zfs分区(计划通过md加载/tmp,所以在这里没有建立/tmp)

zfs create zroot/var
zfs create zroot/usr
zfs create zroot/home

安装系统

export DESTDIR="/zroot"
cd /dist/8.*
cd base && ./install.sh
cd ../lib32 && ./install.sh
cd ../manpages && ./install.sh
cd ../src && ./install.sh all
cd ../kernels && ./install.sh generic
cp -Rlpv /zroot/boot/GENERIC/* /zroot/boot/kernel/

配置基础系统和zfs引导配置

chroot /zroot

基础配置文件

/etc/src.conf

LOADER_ZFS_SUPPORT=YES

/boot/loader.conf

zfs_load="YES"
vfs.root.mountfrom="zfs:zroot"
vfs.root.mountfrom.options="rw"
vfs.zfs.prefetch_disable=0

/etc/rc.conf

hostname="gptzfsboot.freebsd.org"
defaultrouter="10.0.0.1"
ifconfig_re0="inet 10.0.0.1 netmask 255.255.255.0"
tmpmfs="YES"
tmpsize="512M"
zfs_enable="YES"

/etc/resolv.conf

nameserver 8.8.8.8

/etc/fstab

/dev/gpt/swap0 none swap sw 0 0

编译安装支持zfs的bootloader

mount -t devfs devfs /dev
export DESTDIR=""
cd /usr/src/sys/boot/
make obj && make depend && make
cd i386/loader
make install

基础的设置命令

passwd

tzsetup

cd /etc/mail && make aliases

退出chroot

umount /dev
exit

完成安装

cp /boot/zfs/zpool.cache /zroot/boot/zfs/
export LD_LIBRARY_PATH=/mnt2/lib
zfs unmount -a
zfs set mountpoint=legacy zroot
zfs set mountpoint=/usr zroot/usr
zfs set mountpoint=/var zroot/var
zfs set mountpoint=/home zroot/home
exit

原文链接:http://wiki.freebsdchina.org/doc/z/8_gpt_zfs

FreeBSD下安装lighttpd支持php

FreeBSD下安装lighttpd支持php

有不恰当的地方欢迎指正By:ghw(gehaowu@gmail.com)

安装lighttpd

记得在SPAWNFCGI前打勾

[X] SPAWNFCGI  Depend on spawn-fcgi utility
#cd /usr/ports/www/lighttpd
#make config
#make install clean

安装php

模块自己看自己需要

#cd /usr/ports/lang/php5/ && make install clean
#cd /usr/ports/lang/php5-extensions/ && make install clean

配置lighttpd

编辑/usr/local/etc/lighttpd/lighttpd.conf,添加以下内容:

server.modules += ( "mod_fastcgi" )
fastcgi.server = ( ".php" =>
  (( "socket" => "/tmp/php-fastcgi.socket",
    "bin-path" => "/usr/local/bin/php-cgi",
     "min-procs" => 1,
     "max-procs" => 1,
     "max-load-per-proc" => 4,
     "bin-environment" => (
     "PHP_FCGI_CHILDREN" => "2",
    #"PHP_FCGI_CHILDREN" => "64",//这里进程数自己看着办
        "PHP_FCGI_MAX_REQUESTS" => "10000" ),
      "bin-copy-environment" => (
        "PATH", "SHELL", "USER" ),
      "broken-scriptfilename" => "enable",
     "idle-timeout" => 20
  ))
)

设置服务

启动lighttpd

#echo ‘lighttpd_enable="YES"’ >> /etc/rc.conf
#/usr/local/etc/rc.d/lighttpd start

网站跟目录是修改这行

server.document-root = "/usr/local/www/data/"

原文链接:http://wiki.freebsdchina.org/howto/n/php_fastcgi_lighttpd

在FreeBSD上运行PostgreSQL数据库

在 FreeBSD 上运行PostgreSQL数据库

概要

* PostgreSQL是自由的对象-关系数据库服务器(数据库管理系统),在灵活的BSD-风格许可证下发行。它在其他开放源代码数据库系统(比如MySQL和Firebird),和专有系统比如Oracle、Sybase、IBM的DB2和Microsoft SQL Server之外,为用户又提供了一种选择。本文主要整理了在 FreeBSD 上运行PostgreSQL数据库的详细安装过程。

配置FreeBSD内核

  options         SYSVSHM
  options         SYSVSEM
  options         SYSVMSG
  options         SHMMAXPGS=65536
  options         SEMMNI=40
  options         SEMMNS=240
  options         SEMUME=40
  options         SEMMNU=120

从Posts安装PostgreSQL

#cd /usr/ports/databases/postgresql90-server/ && make install

配置PostgreSQL

往rc.conf里增加启动项

postgresql_enable="YES"

初始化数据库

# /usr/local/etc/rc.d/postgresql initdb

终端回显

tomato# /usr/local/etc/rc.d/postgresql initdb
属于此数据库系统的文件宿主为用户 "pgsql".
此用户也必须为服务器进程的宿主.
数据库簇将带有一下 locales 初始化
  COLLATE:  C
  CTYPE:    zh_CN.UTF-8
  MESSAGES: zh_CN.UTF-8
  MONETARY: zh_CN.UTF-8
  NUMERIC:  zh_CN.UTF-8
  TIME:     zh_CN.UTF-8
initdb: 无法为语言环境"zh_CN.UTF-8" 找到合适的编码配置
缺省的文本搜索配置将会被设置到"simple"

创建目录 /usr/local/pgsql/data … 成功
正在创建子目录 … 成功
选择默认最大联接数 (max_connections) … 100
选择默认共享缓冲区大小 (shared_buffers) … 32MB
创建配置文件 … 成功
在 /usr/local/pgsql/data/base/1 中创建 template1 数据库 … 成功
初始化 pg_authid …  成功
初始化dependencies … 成功
创建系统视图 … 成功
正在加载系统对象描述 … 成功
创建字符集转换 … 成功
正在创建字典 … 成功
对内建对象设置权限 … 成功
创建信息模式 … 成功
loading PL/pgSQL server-side language … 成功
清理数据库 template1 … 成功
拷贝 template1 到 template0 … 成功

警告: 为本地连接启动了 "trust" 认证.
你可以通过编辑 pg_hba.conf 更改或你下
次运行 initdb 时使用 -A 选项.

成功. 您现在可以用下面的命令运行数据库服务器:

    /usr/local/bin/postmaster -D /usr/local/pgsql/data
或者
    /usr/local/bin/pg_ctl -D /usr/local/pgsql/data -l logfile start

tomato#

运行PostgreSQL服务

# /usr/local/etc/rc.d/postgresql start

允许其他非本地IP链接

vi /usr/local/pgsql/data/postgresql.conf
   listen_addresses = ‘*’

修改用户密码加密方式

vi /usr/local/pgsql/data/pg_hba.conf
    host  all  all  10.0.1.0/24  md5

增加数据库用户

    #su pgsql
    $ createuser -sdrP pgsqldb

安装phpPgAdmin,网页版PGSQL管理工具

    #cd /usr/ports/databases/phppgadmin
    #make install clean
    #ln -s /usr/local/www/phpPgAdmin /usr/local/www/data/

通过http://localhost/phppgadmin访问

原文链接:http://wiki.freebsdchina.org/doc/d/pgsql_running

FreeBSD 8.0开始官方支持VirtualBox虚拟机了

FreeBSD 从8.0开始终于有官方支持的宿主虚拟服务了VirtualBox。 VirtualBox有一个开源版本和一个私有版本。

FreeBSD运行的是开源版本(OSE 版本),这个版本不支持的功能主要是:

    USB
    OpenGL support

基本安装见 FreeBSD操作手册[URL:http://www.freebsd.org/doc/zh_CN.GB2312/books/handbook/virtualization-host.html]。

CD/DVD使用:

在/etc/devfs.conf中设置:

  perm cd0 0666
  perm xpt0 0666
  perm pass0 0666

网络配置:
默认为NAT模式;在/boot/loader.conf配置如下;

    vboxdrv_load="YES"
    atapicam_load="YES" 

如果使用网桥模式,在/boot/loader.conf配置如下:

    vboxdrv_load="YES"
    vboxnetflt_load="YES"
    atapicam_load="YES"

atapicam模块作用是启动CD/DVD支持,apapicam模块需要在vboxdrv模块之后运行。

原文链接:http://wiki.freebsdchina.org/software/v/virtualbox

FreeBSD ZFS存储服务器的规划

FreeBSD ZFS存储服务器的规划

注意:本文内容已经过时。TODO:需要进行一部分改写,包括:zpool根fs不应挂载、关于如何配置纯ZFS系统的介绍、4K扇区等话题。

FreeBSD 7.0具备以 ZFS 作为根文件系统的能力。本文将以一台有6块硬盘的服务器介绍从FreeBSD/amd64 7.0 LiveFS光盘(随发行版发行的LiveCD系统)全新安装一份FreeBSD,并使用ZFS作为根目录的具体方法。

存储的规划

我们假定有6块750GB的SATA硬盘,ad0-ad5;系统有8GB RAM,希望作为存储服务器。在尽量保证数据完整性和性能的前提下,我们会希望有:

    使用五块硬盘作为RAIDZ1或RAIDZ2卷;一块硬盘作为备盘;
    系统的引导和配置信息保存2份,以便当系统无法引导时进行灾难恢复;
    适当大小的 swap 空间,在本例中,我们选择的容量是 8GB。

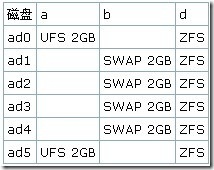
分区如下所示:

FreeBSD ZFS存储服务器的规划

说明:对于新系统,可以使用 GPT 分区、纯ZFS。此时,分配格局大致如下:

FreeBSD ZFS存储服务器的规划

初始化命令为:

gpart create -s gpt ad0
gpart add -s 94 -t freebsd-boot ad0
gpart bootcode -b /boot/pmbr -p /boot/gptzfsboot -i 1 ad0
gpart add -s 4194304 -t freebsd-swap -l swap0 ad0
gpart add -t freebsd-zfs -l disk0 ad0

准备

使用 LiveFS 光盘引导之后会自动进入sysinstall,选择 Fixit → CDROM。进入Fixit shell,会看到这样的提示符:

Fixit#

这时,我们可以开始分区了。首先,初始化覆盖所有磁盘的slice:

fdisk -IB /dev/ad0
fdisk -I /dev/ad1
fdisk -I /dev/ad2
fdisk -I /dev/ad3
fdisk -I /dev/ad4
fdisk -IB /dev/ad5

接下来在这些磁盘上初始化bsdlabel。由于 bsdlabel 需要调用 vi(透过 EDITOR 环境变量),而 sysinstall会将这个环境变量设置为 /mnt2/stand/vi,因此需要改一下:

unsetenv EDITOR
bsdlabel -wB /dev/ad0s1
bsdlabel -w /dev/ad1s1
bsdlabel -w /dev/ad2s1
bsdlabel -w /dev/ad3s1
bsdlabel -w /dev/ad4s1
bsdlabel -wB /dev/ad5s1

分别编辑这些labels。对于ad0和ad5,类似这样:

8 partitions:
#           size        offset        fstype
a:  4194304              16      unused
c:              *                0       unused
d:             *                 *       unused

对于ad1-ad4,类似这样:

8 partitions:
#           size        offset        fstype
b:  4194304              16      unused
c:              *                0       unused
d:             *                 *       unused

我们希望不因为盘序问题导致混乱,因此会用到 geom label。在本次启动时,我们并不立即创建 ZFS,而只是初始化一个用于启动的 UFS 分区:

newfs -L boot /dev/ad0s1a
mount -o async /dev/ufs/boot /mnt

下面,从光盘上复制一系列文件到这个分区上:

cd /mnt
cp -pR /mnt2/*bin /mnt2/boot /mnt2/etc /mnt2/lib* /mnt2/usr /mnt2/var .
mkdir dev

接下来进行初步的配置:

cd /mnt/boot
rm loader.conf mfsroot.gz
echo "/dev/ufs/boot / ufs rw 0 0" > /mnt/etc/fstab
echo "/dev/ad1s1b none swap sw 0 0" >> /mnt/etc/fstab
echo "/dev/ad2s1b none swap sw 0 0" >> /mnt/etc/fstab
echo "/dev/ad3s1b none swap sw 0 0" >> /mnt/etc/fstab
echo "/dev/ad4s1b none swap sw 0 0" >> /mnt/etc/fstab
touch /etc/rc.conf
cd /
umount /mnt
tunefs -n enable /dev/ufs/boot

现在就可以从硬盘引导系统了。

创建 ZFS

从硬盘引导之后,以 root 身份登录。首先,我们为将要加入 zpool 的磁盘指定 GEOM label:

glabel label disk0 /dev/ad0s1d
glabel label disk1 /dev/ad1s1d
glabel label disk2 /dev/ad2s1d
glabel label disk3 /dev/ad3s1d
glabel label disk4 /dev/ad4s1d
glabel label disk5 /dev/ad5s1d

然后,在其上建立 zpool,我们将这个zpool命名为tank,将disk0-4作为其raidz1成员,并使用disk5作为热备盘:

zpool create tank raidz /dev/label/disk[0-4] spare /dev/label/disk5

此时,这个zpool会被自动挂接到 /tank。如果CPU比较快,通常启用压缩会改善性能:

zfs set compression=on tank

复制文件

首先需要为现在我们用来引导的这个 UFS 卷指定一个归宿:

mkdir /tank/bootdir

系统引导之后,需要访问某些 /boot 的内容:

cd /tank
ln -s bootdir/boot boot

复制 / 到 /tank:

cd /
cp -pR /*bin /etc /lib* /usr /var /tank
mtree -deUf /etc/mtree/BSD.root.dist -p /tank
mtree -deUf /etc/mtree/BSD.var.dist -p /tank/var
chmod u+s,g+s /tank/usr/bin/su

配置以ZFS作为 / 启动,修改 /boot/loader.conf 使其包含:

zfs_load="YES"
vfs.root.mountfrom="zfs:tank"

将 zpool 上的 ZFS 挂接方式改为 legacy:

zfs set mountpoint=legacy tank

在重启之前,需要修改 /etc/fstab:

/dev/ufs/boot /bootdir ufs rw 0 0

重新启动系统。此时根目录应该就是 zfs 了,接下来,可以在 /etc 中进行配置。

此后,建议使用通常的方式联编系统,以确保文件/目录权限的正确性。

配置的备份和同步

我们前面将 /dev/ad5s1a 留作配置备份卷。这个卷在未来出问题的时候应该是可以帮助你启动的,现在我们来对它进行初始化:

newfs -U -L altboot /dev/ad5s1a
mkdir -p /altbootdir

接下来我们需要将 /bootdir 的内容复制过去:

mount /dev/ufs/altboot /altbootdir
cd /bootdir
tar cf – * | tar xf – -C /altbootdir

平时将 /altbootdir 卷卸下即可。当对系统的配置进行较大的变动,特别是对 zpool 内容进行变动或升级内核之后,应再次重复前面的复制步骤。

原文链接:http://wiki.freebsdchina.org/doc/z/zfs_root

FreeBSD 7.3下Nginx+PHP(php-fpm)配置笔记

FreeBSD 7.3下Nginx+PHP(php-fpm)配置笔记

都说Nginx的性能比Apache NB,找了很多相关的安装资料,终于实现完成了FreeBSD+Nginx+PHP的配置。网上多数Nginx+PHP的配置都是使用的spawn-fcgi,需要额外安装lighttpd或者单独安装spawn-fcgi,其实PHP自带的php-fpm也挺好用的。

一、安装Nginx

# cd /usr/ports/www/nginx
# make install clean

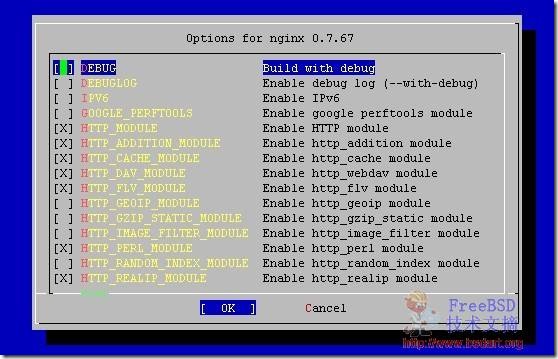
选上自己需要的模块

FreeBSD Nginx安装

二、安装PHP

# cd /usr/ports/lang/php52
# make install clean

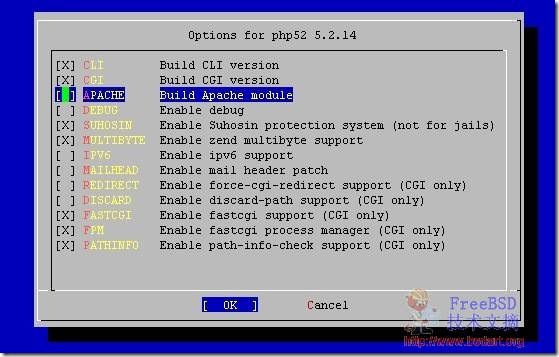
记得选择FASTCGI和FPM模块

FreeBSD PHP5安装

然后安装php52-extensions

# cd /usr/ports/lang/php52-extensions
# make install clean

根据需要选择相关的模块

三、配置php-fpm

# vi /usr/local/etc/php-fpm.conf
根据实际环境修改如下参数:

<value name=”listen_address”>127.0.0.1:9000</value>
<value name=”owner”>www</value>
<value name=”group”>www</value>
<value name=”mode”>0666</value>
<value name=”max_children”>5</value>
<value name=”request_slowlog_timeout”>0s</value>
<value name=”max_requests”>500</value>

四、启动php-fpm

# vi /etc/rc.conf

php_fpm_enable=”YES”

# /usr/local/etc/rc.d/php_fpm start

五、配置Nginx

user  www www;
worker_processes  8;

events {
use kqueue;
worker_connections  51200;
}

http {
include       mime.types;
default_type  application/octet-stream;

server_names_hash_bucket_size 128;
client_header_buffer_size 32k;
large_client_header_buffers 4 32k;
client_max_body_size 8m;

sendfile        on;
tcp_nopush     on;
keepalive_timeout  65;

fastcgi_connect_timeout 300;
fastcgi_send_timeout 300;
fastcgi_read_timeout 300;
fastcgi_buffer_size 64k;
fastcgi_buffers 4 64k;
fastcgi_busy_buffers_size 128k;
fastcgi_temp_file_write_size 128k;

gzip  on;
gzip_min_length  1k;
gzip_buffers     4 16k;
gzip_http_version 1.0;
gzip_comp_level 2;
gzip_types       text/plain application/x-javascript text/css application/xml;
gzip_vary on;

tcp_nodelay on;

server {
listen      80;
server_name  www.bsdart.org;
root  /data/web/htdocs;
index index.htm index.html index.php;

location ~ .*\.(php|php5)?$ {
fastcgi_pass   127.0.0.1:9000;
fastcgi_index  index.php;
include        fastcgi.conf;
}

error_page   500 502 503 504  /50x.html;
location = /50x.html {
root   html;
}
}
}

五、启动Nginx

# vi /etc/rc.conf

nginx_enable=”YES”

# /usr/local/etc/rc.d/nginx start

在FreeBSD上运行MySQL数据库

在 FreeBSD 上运行MySQL数据库

概要

FreeBSD 7.0包含了大量针对多处理器系统的可伸缩性改进。本文的目的在于整理一系列适用于 FreeBSD 7.0 的运行 MySQL的技巧。

硬件准备

一般而言,增加可用的 CPU 数量,会显著地改善数据库的查询性能。除此之外,在规划硬件配置时,还应考虑一些其他问题:

    将不同性质的读写操作分散到不同的物理磁盘上

成本方面的考虑,通常说来,对于顺序读写操作,使用ATA/SATA硬盘完全能够胜任。这包括服务器日志、数据库事务日志等等。而对于随机读写操作,如数据库数据文件,则推荐使用SCSI或SAS硬盘。此外,将不同性质的读写操作分散到不同的物理盘上,有助于降低发生故障时将数据完全丢失的风险,并可以有效地避免将单块磁盘的I/O性能耗竭,而导致系统响应时间变差。

    使用合适的数据块尺寸来初始化文件系统

在初始化文件系统时,数据块尺寸会决定文件系统一次性向磁盘发出读写请求时的数据量。请参考你的数据库的用户手册来了解合适的尺寸大小。对于 UFS 而言,较大的数据块还可以带来的一个“副作用”是,由于大数据块会使文件系统中的重要数据单元——柱面组的数量下降,对性能会有一定改善,并且会显著减少fsck所需的时间。

    使用更多的内存

编译系统

默认配置的 FreeBSD 7.0 采用传统的 4BSD 调度器,因此需要将其替换为 ULE 调度器:

cd /usr/src/sys/`uname -p`/conf
sed -e s,4BSD,ULE,g GENERIC > DB-GENERIC
cd /usr/src
echo KERNCONF=DB-GENERIC >> /etc/make.conf
make buildworld buildkernel && sudo make installkernel installworld

MySQL 的编译

我们推荐使用的 MySQL 版本是 5.0。推荐的 ports.conf 项目为:

databases/mysql*-server: BUILD_OPTIMIZED=yes|WITH_XCHARSET=yes

安装方法:

portinstall databases/mysql50-server

ports安装具体方法:

#cd /usr/ports/databases/mysql51-server     #这里以安装mysql5.1为例
#make install clean
#rehash
#cp /usr/local/share/mysql/my-large.cnf /etc/my.cnf            #服务器内存1G,但是与apache在一起

/usr/local/share/mysql下面有5个my-xxxx.cnf文件

my-small.cnf 最小配置安装,内存?64M,数据数量最少

my-large.cnf 内存=512M

my-medium.cnf 32M<内存<64M,或者内存有128M,但是数据库与web服务器公用内存

my-huge.cnf 1G<内存<2G,服务器主要运行mysql

my-innodb-heavy-4G.cnf 最大配置安装,内存至少4G

在 rc.conf.local 里面做如下设置

mysql_dbdir="/path/to/MySQL_data"
mysql_enable="YES"

其中 /path/to/mysql_data 是 MySQL 数据库所在的位置。在第一次通过 MySQL 的 rc 脚本启动 MySQL 的时候,rc 脚本会负责正确的初始化 MySQL 的数据库。

原文链接:http://wiki.freebsdchina.org/doc/d/database_running